29 März 2014

Scrap Your Kit [Sugar Rush]


Hei and welcome to my scrappy and crafty blog! I am very busy working on some secret projects so I will not show you cards today. Instead I made a collage with nine of the ten scrapbook pages I scrapped with the Sugar Rush scrapbook kit and Jelly Beans add on by Studio Calico.


I loved this kit but I call it officially killed today! Yeah! The next two weeks I will show you all my scrapbook pages I made with the Office Hours kit by Studio Calico! Have a nice weekend!

28 März 2014

My Project Life [Sugar Rush]

Hei! Its friday and today I want to show you 5 Project Life pages which I made with the Sugar Rush Project Life kit by Studio Calico.


27 März 2014

Scrap Your Kit - Sugar Rush [My Iphone]


Hei and welcome back! I promised yesterday that I will show you my last scrapbook layout with the Sugar Rush scrapbook kit by Studio Calico. Well, when I try to "kill a kit" as we scrappers say, I do not have a lot of embellishments and papers left in the end, so this layout has less stuff on the white cardstock as I usually would take. But I kind of like this look. I really love the silver triangles! They remind me of the triangles on my wallpaper for my Iphone.


And yes, my Iphone is really important to me these days! I am glad I have one, they are quite pricy in Norway.


26 März 2014

Scrap Your Kit - Sugar Rush [Welcome 2014]


This is my starting page for my 2014 album. I love these big wooden veneer numbers! I made this scrapbook layout with the Sugar Rush scrapbook kit and Jelly Beans add on by Studio Calico after the march sketch by the australian online magazine Life. Paper. Scrapbook which I love btw. One of my best scrapfriends Alexandra is part of the designteam. She posted a great tutorial for monochrome scrapbooking yesterday! Check it out!

Tomorrow I will show you one last scrapbook page with the Sugar Rush kit and at friday I will show you my Project Life pages with the Sugar Rush PL kit! So stay tuned!

24 März 2014

Scrap Your Kit - Sugar Rush [Norwegian? Yes!]


I love "Mollie Makes", but the english version of this beautiful craft magazine is so expensive in Norway. Since last year you can buy the cheaper norwegian Mollie Makes here. I do not understand every single word but that is totally ok for me, I am a learner and one day I will speak Norwegian fluently. "Mollie Makes på Norsk" helps me to improve my norwegian skills, win-win!

I made this scrapbook layout with the Sugar Rush kit and I love the striped background paper and all those wonky hearts! I lifted a page by Shimelle.

22 März 2014

Cardmaking - Mood Board [Outer Space]


Source: Pinterest
Hei and welcome to another edition of my cardmaking series. I have this wonderful mood board "Outer Space" for you and I made in total 11 cards. My boys always need cool cards for their friends, so these cards come in quite handy.

First I gathered some old stash. I love the "Rocket Age" collection by Octover Afternoon, but I used other cute scrap stuff from Studio Calico and Simple Stories too.


In the end I didn´t use all stuff, but I used at least some stickers, paper, die cuts and the stamps.

Here are my cards. I hope you like them, my boys love these cards so much and can´t wait to give these to all their friends at birthdayparties!


Next saturday I want to show you more cute cards! So stay tuned!


19 März 2014

Scrap Your Kit - Sugar Rush [Lanzarote 2014]


Hei! Do you want to see more scrapbook layouts with the wonderful "Sugar Rush" scrapbook kit by Studio Calico? Yes? Fine, here is another one. I love the color combination of the dark blue and all the green and yellow colors. I used some of these cute gold dipped leafs and I finished the layout off with a lot of those cute enamel dots in different sizes and colors.

Tomorrow I will show yoy more pages with this kit. So stay tuned!

18 März 2014

Scrap Your Kit - Sugar Rush [Good Morning, Warm And Sunny]

Hei and welcome back to my scrappy blog. I hope you loved my spring project over at the Pebbles Blog yesterday. My best friend here in Norway loved it and she took a picture of the gift box and showed it on her blog (stoffsymphonie.blogspot.no) yesterday! I made some cute gifts for her kids too. You can see them on the blog too.

Today I want to show two more scrapbook layouts featuring the Sugar Rush kit and Jelly Beans
add on by Studio Calico!
The first one is about a beautiful and sunny morning at Playa Blanca and I lifted a page by Paige Evans, I love her patchwork style as I call it. I used several small pieces of patterned paper and a lot of those embellishments that came with the kits! Love the tiny pink cameras and the wood veneer shapes are adorable too.


The second scrapbook layout is about our walking trip to the harbor of Marina Rubicon. It was a sunny and warm day and we all loved the view.


Tomorrow I will show you one last page with the Sugar Rush kit. So stay tuned!

17 März 2014

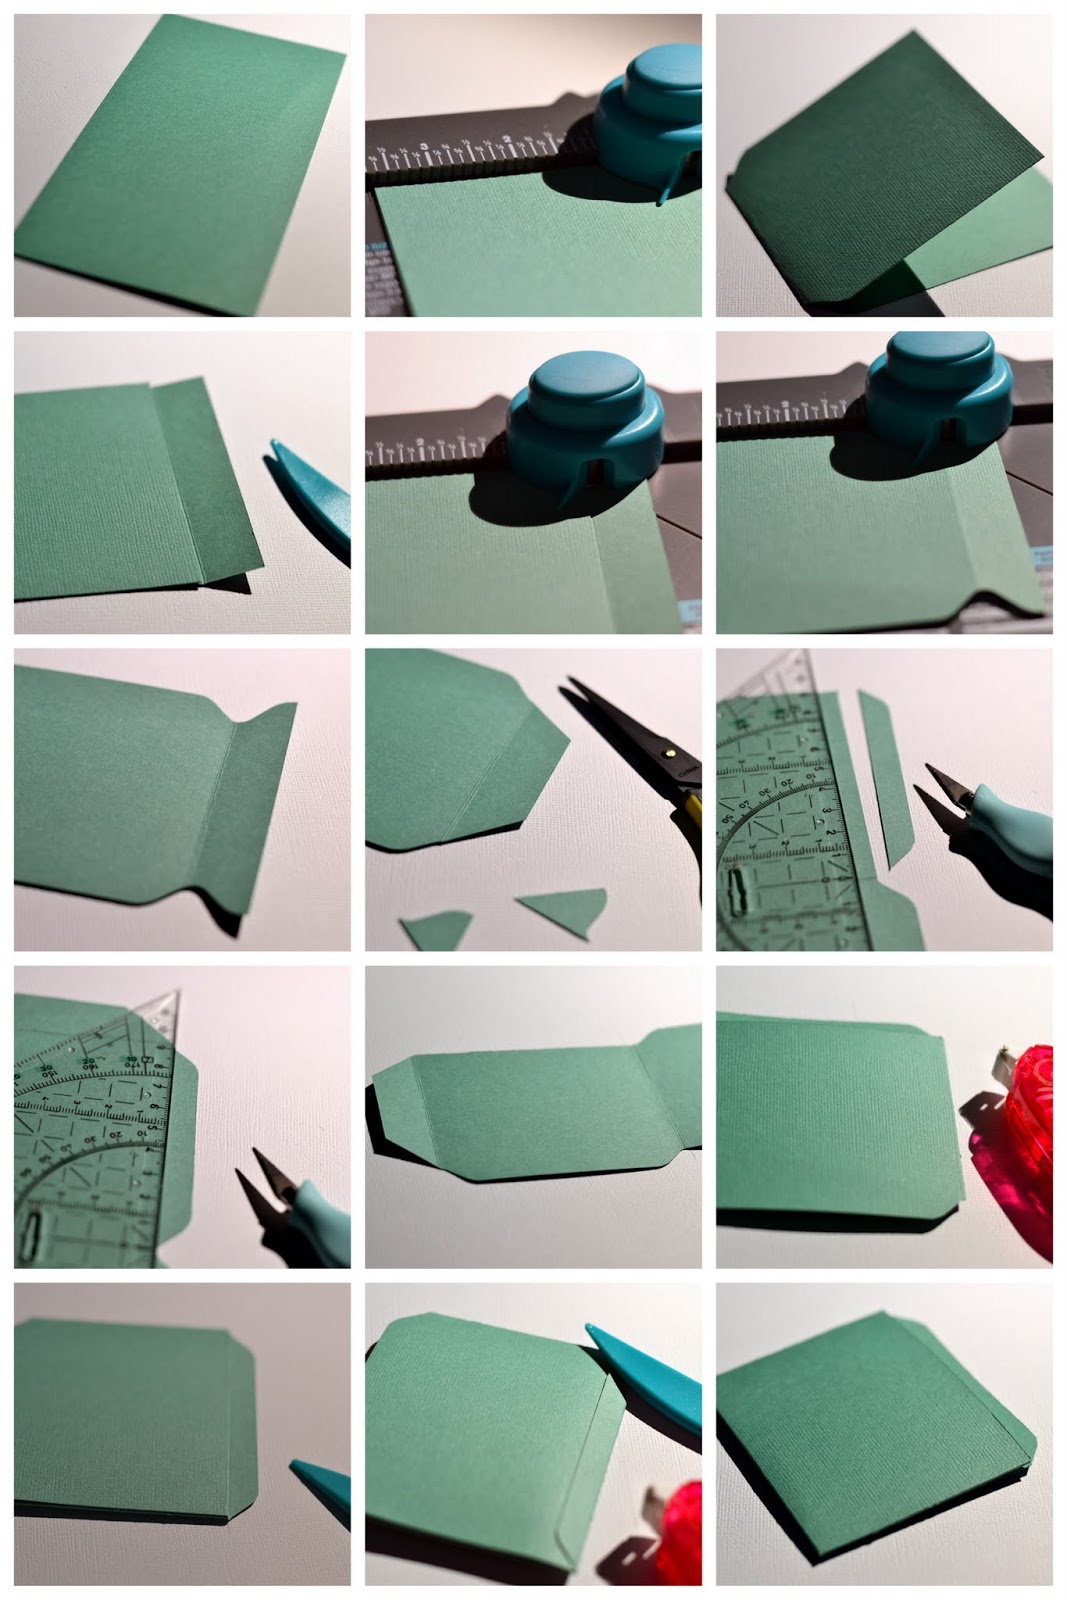
Step-By-Step Tutorial [Coin Envelope, Library Pocket]

Hei and welcome to my crafty blog! Today I want to show you how you can make a library pocket and a coordinating coin envelope! I made both envelope and pocket with the envelope boarder punch by We R Memory Keepers.


Step 1: Take a 6x6 patterned paper
Step 2: Line the paper up at 2 5/8 inches, punch and score
Step 3: Turn the paper, line the paper up at the first score line, punch and score.
Step 4: Repeat step 3 two times.
Step 5: Paper must look like this.
Step 6: Take a triangular ruler and score the two flaps at the upper and bottom side of your envelope.
Step 7: Fold the other two flaps inside, score at the line where the two flaps come together. Fold one flap inside. Adhere the flap.
Step 8: Fold the upper and bottom flap inside, adhere the bottom flap and mark the coin envelope with a pen where the fastener will be attached.
Step 9: Punch out two small circles.
Step 10: Make holes in these circles.
Step 11: Attach the two circles with some cute brads.
Step 12: Close coin envelope with some bakers twine.


Step 1: Take a 3,5x8 inch cardstock or patterned paper.
Step 2: Punch paper at 3 5/8 inch. Flip the paper and punch a second time at 3 5/8 inch.
Step 3: Fold the paper.
Step 4: Score line.
Step 5: Punch at the scored line.
Step 6: Punch at the other side too.
Step 7: The paper must look like this.
Step 8: Take your favorite scissors and cut 2 triangles out of the flap.
Step 9: Use your ruler and craft knife to cut out a flap on the bottom side of the paper.
Step 10: Turn the paper up side down and use your ruler and craft knife again to cut out the second flap of the upper side of the paper.
Step 11: Paper looks like this.
Step 12: Fold the paper and adhere the flap.
Step 13: Score the line at the bottom side of the pocket.
Step 14: Adhere the bottom flap to the pocket.
Step 15: Your library pocket looks like this.

Here you can see the finished coin envelope and the library pocket! I used a circle punch to punch out the half circle!


I hope you had fun with my step-by-step tutorials! Have fun with your crafting and see you next time! Thanks for stopping by!
You can see my beautiful spring project with coin envelopes and library pockets over at the Pebbles Blog today!

14 März 2014

Scrap Your Kit - Sugar Rush [Playa Blanca, Blue&Blue]


Hei and welcome back to my crafty and scrappy blog! I hope you had fun last wednesday with the monthly "happy scrappy friends" blog hop! I picked up some really good inspiration and want to thank all the girls who participated in the hop. It was fun! I am really looking forward to  our next blog hop in april. Don´t miss it!

Today I want to show you more scrapbook layouts featuring the Sugar Rush scrapbook kit and Jelly Beans add on. I really love the add on, so cool colors and embellishments. And again I scrapped some pictures from our last vacation in december and january. I just love to preserve all those memories! And I really love the beach at Playa Blanca!

The first page shows Playa Blanca. I took that picture on our walking trip from the lighthouse back to Playa Blanca.


The second page is about our beachday at the Papagayo Beach. Its a long walking trip to that beach, but its worth it though. 


Next monday I will show more scrapbook layouts with the Sugar Rush kit, so stay tuned! And don´t forget tomorrow, its saturday again and I will present you some cute cards! :)

12 März 2014

Happy Scrappy Friends Blog Hop [Popcorn Boxes and Tags]


Hei and welcome back to the monthly Blog Hop presented by The Happy Scrappy Friends! Maybe you came over from Jana and have already seen a lot of cute projects with our new theme!

Today we want to show you some projects we have made after a Circus/Carnival theme. We want to bring some joy and entertainment to you. You can find a Mood Board over here at Pinterest. Have a look!

I found this bottle tray in one of my favorite shops in Norway.
I used the new Americana collection by Pebbles to make some cute tags. Love these pinwheels, aren´t they just fun? These bottles filled with rasberry juice are perfect for a Circus/Carnival themed birthday party, right?


And of course you need some popcorn to serve to the birthday guests. All kids love popcorn, but in Norway they are salted. so I made salted ones for the kids.  just love both sorts of popcorn, the sweet ones remind of visits to the an old cinema called Schauburg in Karlsruhe, Germany.


I made these boxes with the help of my favorite punch board ever! You can not only make cute envelopes with the envelope punch board by WeRMemoryKeepers but this tool is also perfect for all sort of gift boxes. Next week I will post more ideas!


I embellished the boxes with corner rounded scraps of patterned paper and stars.


Here is a step-by-step tutorial to make these cute popcorn boxes.


1. Take a 6x6 patterned paper.
2. Line the paper up at 2 inches, punch and score.
3. Line the paper up at 3 1/8, punch and score.
4. Turn the paper, line the paper up at the first score line, punch and score.
5. Aline the paper at the second score line, punch and score.
6. Repeat this for the 3rd side of the paper. For the last side of the paper, you only have to punch the paper, no scoring needed!
7. All 4 sides are punched and 3 sides are scored!
8. Turn the envelope punch board and punch all 4 flaps.
9. Take your favorite sciccors and cut slits into the flaps at the bottom of your paper.
10. Adhere all flaps.
11. Almost finished!
12. Use your tiny attacher to close the box.


I hope you had fun with my project! Now you can hop over to Nina, who will show you another great project! Thanks for stopping by, have a nice day!

Here are all the participants of todays Happy Scrappy Friends Blog Hop:

Marjan [you are here!]
Sandra